
The part that fixes most running toilets costs somewhere around 6.00 to 12.00 dollars. The plumber who installs it for you costs 75.00 to 200.00 dollars, because labour is most of that bill (RepairHero toilet repair cost breakdown). Treat both of those as approximate rather than quoted — part prices move and regions differ — but the ratio holds, and the ratio is the reason this job is worth an hour of your Saturday.
Meanwhile the toilet keeps running. A worn flapper can silently leak thousands of gallons a year, which is why the Environmental Protection Agency’s WaterSense programme recommends checking the flapper periodically and replacing it at least every 5 years (EPA WaterSense, Fix a Leak Week). You are paying for that water every month whether or not you ever hear the hiss.
There are 3 things that cause this, and 1 test that tells you which. Start with the test. If you buy parts first you will probably buy the wrong one, and you will find that out standing over an open tank with the water already off.
On the Rise puts this one in the quick-fix column for a reason: the diagnosis is free, the parts are cheap, and the failure modes are few enough to name all of them.
What you need for this: no plumbing experience, no soldering, no cutting. If you can turn a valve and hold a sponge, you can do every path below. Your toilet tank holds clean water, not waste, so the worst thing you will get on your hands is mineral grit.
The 10-minute test that names the culprit
Put a few drops of food colouring into the tank, leave it alone, and check the bowl. If any colour has reached the bowl after 10 minutes, the toilet is leaking (EPA WaterSense). Flush right afterward so the dye does not stain the tank.
This works because a sealed tank is sealed. Water should only travel from tank to bowl when you flush it. Colour in the bowl means water is getting past the flapper — the rubber seal at the bottom of the tank — and the flapper is the cheapest part in there. That is the outcome you want, because it is the outcome your wallet prefers.
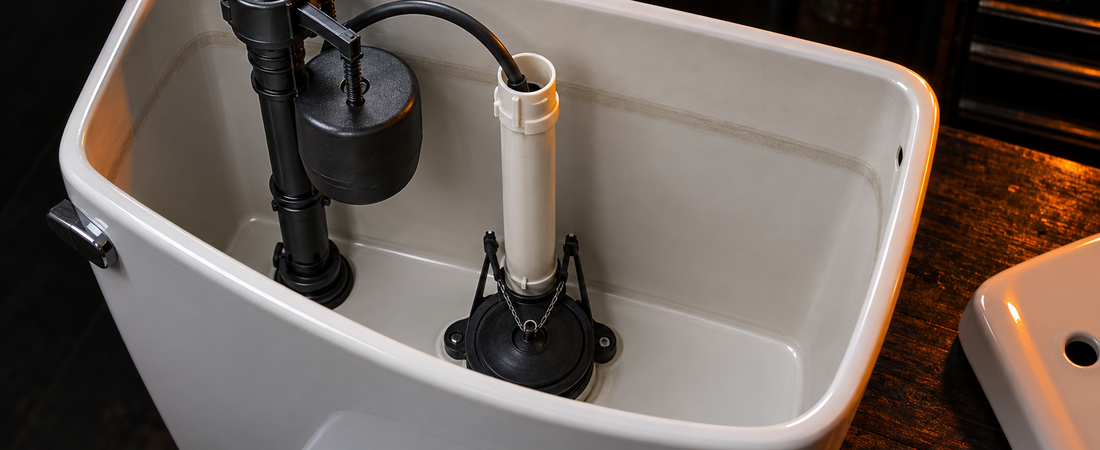
While you wait out the 10 minutes, lift the lid off and watch what your tank is doing. You are looking for water trickling over the lip of the overflow tube, which is the tall vertical pipe in the middle. If you can see that, you already know your answer before the dye reports in.
If the dye stays put in the tank and the toilet still runs, the leak is going the other way: water is entering faster than it should and spilling down the overflow tube. That points at the water level or the fill valve, and the next section splits those.
Same test, 20 minutes, from a plumbing editorial standpoint: if coloured water shows up in the bowl, the flapper is not sealing tightly (This Old House). Either window works. The 10-minute version just gets you to the hardware store sooner.
Before anything comes apart
2 steps, in this order, every time.
Turn off the water at the shutoff. It is usually a small valve in the floor or on the wall behind the toilet. If there is no shutoff there, shut off the water to the whole house (The Home Depot).
Flush and drain the tank. Hold the handle down until water stops moving from tank to bowl, or hold the button on a dual-flush unit. Then get the rest out: sponge or towel it up, or vacuum it with a wet vac, and wipe the sediment off the bottom while you are in there (The Home Depot). For a fill-valve swap you want every last bit of water gone, and a turkey baster or wet vac is how you get the final half-inch (This Old House).
Keep a basin or a dry towel under the connection you are about to open, because a small amount of water stays trapped in the valves and pipes no matter how well you drained (The Home Depot).
Do not skip the drain step because your repair looks like it sits above the water line. You will tip the tank water when you lean on it, and you will be mopping instead of fixing.
Tools: a sponge, a towel, an adjustable wrench or channel-lock pliers, and a bucket. That is it. If you own the basics covered in the everyday tool guide already published here, you own everything this job needs.
Path 1: the flapper, which is most of these
If the dye test put colour in the bowl, replace the flapper. This is the cheapest and most common outcome.
Take the old one to the store rather than guessing, because flappers vary by tank and a near-match will leak in a way that looks exactly like the problem you came to fix. Expect roughly 2.00 to 15.00 dollars for the part, with most standard replacements sitting in the 6.00 to 12.00 dollar range (fill valve and flapper cost comparison). Approximate, again — that is a range and not a quote.
Unhook the old flapper, seat the new one, and reconnect the chain at the same length it was before (The Home Depot). Chain length is the step people get wrong. It needs a small amount of slack when the flapper is closed (This Old House) — too tight and the chain holds the flapper open, which is the same running toilet with a brand new part in it. Too loose and the chain tangles under the flapper, which is also the same running toilet.
While the tank is empty, run a finger around the seat the flapper closes against. Mineral scale or grit on that rim will keep a perfect flapper from sealing. A soft brush or scouring pad clears it (This Old House).
Path 2: the water level, which costs nothing
If the dye stayed in the tank, look at the water line instead of the parts.
Water should sit about 1 inch below the top of the overflow tube (This Old House). Set it too high and the tank quietly pours the excess down the overflow tube forever, and the fill valve keeps topping it up to replace what it just lost. That is a running toilet with nothing broken in it.
Note that published targets differ by hardware. One major retailer’s guidance sets the level about ¼ inch below the top of the fill tube instead (The Home Depot). Different reference point, different number, and your valve may have its own marked line. The principle is the one that matters: below the tube, never at it.
To check whether the valve is the problem or just the setting, lift the fill valve arm. If the water stops, the valve works and the setting is wrong — turn the adjustment screw, then flush between adjustments to see where the level actually settles (The Home Depot). This repair costs nothing and takes about 4 minutes.
Path 3: the fill valve, the one that takes real time
If lifting the arm does not stop the water, the fill valve is done and gets replaced. Budget roughly 8.00 to 60.00 dollars for the part, commonly 20.00 to 40.00 dollars for a basic diaphragm or piston style (cost comparison).
Water off, tank fully dry, disconnect the supply line, release the locknut underneath the tank, lift the old valve out, set the new one to the height the instructions specify, tighten by hand plus a small turn, reconnect and test. Then adjust so the level lands where the previous section said, flushing between adjustments (This Old House).
This is still a beginner-level job, and the whole project including a parts run comes in under 2 hours (The Home Depot). It just has more connections to get wrong than the other 2 paths, so work slowly at the locknut and do not overtighten plastic threads.
The mistake that sends people back to the store
Buying parts before running the test.
The dye test costs nothing and takes 10 minutes, and it is the difference between a 6.00 dollar fix and a 30.00 dollar fix you did not need. Walking in and replacing the fill valve on a toilet with a worn flapper leaves you with a running toilet and a receipt. The whole system has 3 failure points and 1 diagnostic, and skipping the diagnostic is how a 1-trip job becomes a 3-trip job.
2 more that cost money:
Overtightening plastic nuts. Hand-tight plus a small turn. A cracked tank fitting turns a 20.00 dollar repair into a new tank.
Reusing a flapper that looks fine. Rubber hardens with age and stops conforming to the seat while still looking perfectly serviceable. The WaterSense guidance is periodic checks and replacement at least every 5 years (EPA WaterSense) — that is a maintenance interval, not a failure response.
You’ve got this
Dye test first. Colour in the bowl means flapper. No colour and still running means check the level, then lift the arm to decide between a free adjustment and a new fill valve. Water off and tank dry before anything comes apart, chain with a little slack, level about an inch below the overflow tube, hand-tight on plastic.
Your total outlay if the test points at the flapper is one part and one trip. On the Rise has no reason to talk you up from there. There are no sponsored placements here and no affiliate money, so nobody is steering you toward a repair kit you do not need. Run the test, buy the 1 part it points at, and get the job done right the first time. Bring the old flapper to the store — that is the tip that saves the second trip.
If the floor around the base is wet rather than the tank running, that is a different repair and a different set of instructions. Same for a tank that cracks while you are working on it. Everything above assumes the water is staying inside the porcelain, and if it isn’t, stop and reassess before reassembling. For the drywall consequences of a leak that already got out, the wall repair guide on this site covers patching by hole size.
Quick Fix — September 25, 2026